

In Free Fire, the most important settings are. If you’re a mobile, tablet, or PC player, your gameplay determines whether you’re in a good game or a bad one. However, when your A to Z Settings for Free Fire are good and comfortable, your gameplay will automatically improve.
I’ve been playing Free Fire since 2019, and I have tested different Free Fire settings like sensitivity, HUD, graphics, FPS, and other important settings. And now, I’m breaking it all down for you.
In this guide, you’ll discover:
Gun Switch Etc.
FF Sensitivity personalisation
Free Fire HUD
Gloo Wall, Sound, and FPS
Table of Contents
Custom HUD Settings for Free Fire
In Free Fire, your HUD (Heads-Up Display) is your control panel during matches. A personalised HUD can help you move faster, shoot more accurately, and gain full control in intense battles. But a poor HUD layout? It can slow you down and lead to easy mistakes.
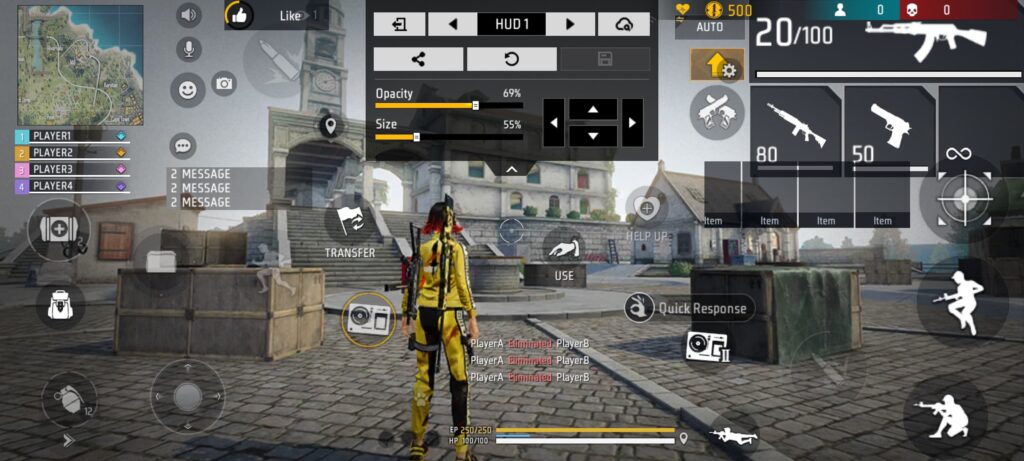
Free Fire Custom HUD Setup (Step-by-Step)
When setting up your Free Fire HUD, the first step is to place the most important buttons correctly.
Follow this basic layout:
- Fire Button – Place it where your right thumb naturally rests.
- This ensures you can shoot instantly without stretching your finger.
- This ensures you can shoot instantly without stretching your finger.
- Gloo Wall & Jump Buttons – Keep them close to each other.
- This helps you build cover or dodge attacks quickly in close fights.
- This helps you build cover or dodge attacks quickly in close fights.
- Crouch Button – Place it near the fire button, but not too close.
- You need to crouch while firing without accidentally tapping the wrong button.
- You need to crouch while firing without accidentally tapping the wrong button.
- Gun Switch & Reload – Position these at the top right corner.
- Easier to switch weapons mid-fight without blocking your screen.
- Easier to switch weapons mid-fight without blocking your screen.
- Joystick – Keep it on the left side, at a comfortable reach for your thumb.
- This helps you move smoothly without losing control.
Related Guide: Free Fire HUD Settings Guide – learn advanced adjustments and device-specific tips.
Why This Layout Works
Now that your buttons are placed, here’s why it matters:
- If your fire button is too far, you’ll shoot slower and lose close fights.
- Keeping Gloo Wall and jumping together lets you react instantly in intense battles.
- Properly spaced crouch and fire buttons help you perform crouch-shoot combos without mistakes.
- Having a gun switch at the top means your main screen stays clear while aiming.
A good HUD reduces finger travel time, which makes every action faster and more accurate.
Adjust for Screen Size
Your device size also affects HUD placement:
- Small screen: Keep all buttons closer together to avoid finger strain.
- Large screen or tablet: You can spread out buttons for more comfort.
Also, customize:
- Button size: Bigger for important controls like fire and Gloo Wall.
- Transparency: So your screen looks clean and uncluttered.
Keep Tweaking as You Improve
Your skills and reflexes will grow over time, so update your HUD regularly.
Here’s how:
- Make one small change at a time.
- Test it in Training Mode or Custom Rooms.
- Keep what feels natural and comfortable, remove what doesn’t.
Pro Guide: Free Fire HUD Codes for Two-Finger Players
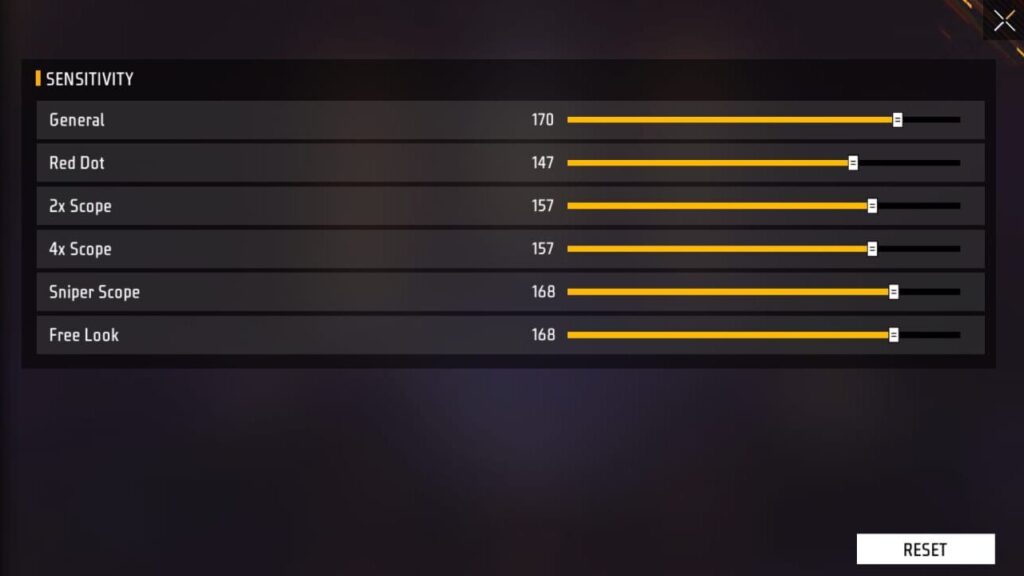
Sensitivity Settings in Free Fire
Sensitivity settings directly affect how fast and accurately you aim in Free Fire, especially when going for one-tap headshots. Whether you’re a two-finger or three-finger player, the right FF sensitivity can make your aim feel smooth, natural, and deadly accurate.
From my experience playing since 2019, I’ve tested dozens of sensitivity combinations across different devices and updates. Here’s what I’ve learned:
Best Sensitivity Setup (2025 Tested)
Here’s a good base setting to start with (especially for mobile players using 60 FPS and 90 Hz screens):
| FF Sensitivity Type | Recommended Value |
|---|---|
| General | 175–190 |
| Red Dot | 150–165 |
| 2x Scope | 105–120 |
| 4x Scope | 120–135 |
| Sniper Scope | 95–115 |
| Free Look | 140–160 |
Note: These are starter values. You can change ±5 points based on:
- Device size (small phones need higher sensitivity)
- Screen refresh rate (90 Hz feels smoother, needs lower values sometimes)
- Your grip and finger speed
Why FF Sensitivity Matters
- High sensitivity allows for faster crosshair movement — ideal for quick sprays and one-taps.
- Customise sensitivity offers more control, which is particularly beneficial for drag shots and long-range stability.
- The trick is to balance both, based on your device’s touch response and your play style.
Read more:
- E-Sports Players Free Fire Sensitivity Settings 2025: Only Red Number Headshots on All Devices
- Free Fire Pro Sensitivity Settings 2025: POCO, IQOO, Realme, और Best Budget Gaming Phones के लिए
Pro Tip for One-Tap Headshots
- Keep General + Red Dot sensitivity close to 100 if you’re a fast swiper.
- Use training mode to test headshot consistency with each gun (especially M500, Deagle, and USP).
- For phones with screen delays, avoid max sensitivity — it may overshoot targets.
Understanding Drag and One-Tap Headshots Settings
What Are Drag Headshots?
Drag headshots means quickly dragging your crosshair onto an enemy’s head while firing, often used with rifles, SMGs, or high-precision weapons. Key advantages:
- Get maximum headshot
- Faster elimination
- Effective across the entire range of guns
Get Full Guide: What is a Drag Headshot in Free Fire and How to Do It?
What Is a One-Tap Headshot?
A one-tap headshot is when you eliminate an enemy with a single, precise bullet to the head. It is also done by dragging quickly and once. Unlike spraying multiple shots, this method is:
- Faster – Instantly kills before the enemy reacts.
- Efficient – Saves ammo and reduces recoil struggles.
- High-Reward – Critical in ranked matches and tournaments.
However, hitting one-taps requires perfect aim, the right sensitivity, and the best weapons.
What is the difference between one tap and a Drag headshot
- One-tap = Stationary, precise aim.
- Drag shot = Flick motion + timing.
Best Guns for Drag and One-Tap Headshots
- Dragheadshot
- AR Rifle: AK, SCAR, Parafale, and others..
- SMGs: MP40, UMP, Mini Uzi, MAC-10, and others.
- One tap headshots settings Gun
- Marksman rifle– SVD, Woodpecker, AC80, and others.
- M1887 / M1014 (Shotguns) – Close-range one-shot potential.
Pro Tip: Test settings in Training Mode before real matches.
Some other important settings in Free Fire
We have covered all the core settings that are essential for your gameplay, but some other settings are also important to complete. Here are the other settings;
Graphics and FPS in Free Fire
Choosing the right graphics is a balancing act between spotting enemies and keeping your game running smoothly.
Graphics
- Smooth: gives low details, and it performs well on low devices
- Stranded: It is medium and better than smooth, which is recommended for average phones.
- Ultra: It is a very popular graphic in Free Fire, and it gives the best performance as well as graphics. It is recommended for high-end devices
- Max: This is the best quality of graphics, which includes Shadows, grass movement, realistic sound, and HD texture.
FPS
- Normal: it is basically 30 FPS and best for low devices
- Enhanced: it is considered to be 60fps and best for medium-range devices
- High: It is about 90 FPS, and it is best for high-end devices.
Gloo Wall in Free Fire
Gloo Wall is a protective shield, and it acts like a cover in every situation, whether you’re playing for close range or long range; it comes with two different settings.
- Auto: When you turn on this setting, you are going to deploy Gloo Wall automatically when you touch the Gloo Wall button.
- Manual: It is mostly used by old players, and it requires first clicking on the Gloo Wall button, then quickly pressing the button to deploy the Gloo Wall
Sound and vibration
Sounds and vibrations are very important in the gameplay of Free Fire whenever an enemy comes nearby, such as the footsteps sound and vibration, and other vibrations as well.
- Enemy-oriented vibration:
- Foot step
- Gunshot.
- Player-oriented vibration
- Taking damage
- Shooting vibration
- Drop item vibration
- Wheel vibration
- Vehicle vibration
- Driving
- in-game damage
- collision
Practice & Consistency: Master Your Settings Like a Pro
Having the best sensitivity, HUD, or control layout is just step one. The real secret to levelling up in Free Fire is practice and consistency.
If you keep changing your settings too often, your muscle memory gets reset, and that makes it harder to aim accurately, place Gloo Walls quickly, or land one-tap headshots.
Stick to One Setup and master It
Once you find a layout and sensitivity that feels comfortable:
- Stick with it for at least a week
- Use training grounds to test one-taps, Gloo Walls, and movement
- Play CS-Ranked and custom rooms to develop real-match muscle memory
Every swipe, tap, and drag builds an automatic response. That’s how pros get those fast reactions — not by changing settings every day, but by mastering their setup over time.
Pro Tip: Small Changes Only
Even experienced players don’t overhaul their settings unless:
- A new game update changes mechanics
- A specific setting stops working (e.g., slow aim or delayed jump)
Make minor adjustments, like moving a fire button slightly or changing sensitivity by 3–5 points. Use the “hit and trial” method in casual games before finalising.
Consistency Beats Constant Changes
Playing regularly is just as important as having good settings. Even the best layout won’t help if you:
- Take long breaks from the game
- Don’t practice your reflexes
- Keep switching between HUDs or fingers
The more consistent your practice is, the smoother and faster your gameplay becomes, especially in high-pressure fights.
Common Mistakes and How Experience Helps
Many beginners in Free Fire struggle not because of bad gameplay, but because of poor settings choices. Here are some common mistakes — and how experience helps you avoid them.
Mistake 1: Using Default Settings
Most new players stick with the default Free Fire HUD, ff sensitivity, and controls. While these may feel simple at first, they’re not optimised for fast movement, drag headshots, gun switching, or One-tap headshots settings. Default setups rarely match your device, screen size, or finger control style.
Mistake 2: Blindly Copying Pro Players
Just because a YouTuber or esports pro uses a certain setup doesn’t mean it will work for you. Your:
- Device refresh rate
- Touch response
- Screen size
- Hand comfort
…all affect how your HUD and sensitivity perform. Copying settings without testing can make your aim worse, not better.
Mistake 3: Changing Settings Too Often
Switching your HUD or sensitivity after every bad match is a major problem. It resets your muscle memory and stops you from building consistency. Good players don’t change their setup randomly — they refine it slowly over time.
How Experience Makes the Difference
Since I started playing in 2019, I’ve seen how updates, meta changes, and mechanics like drag shots and one-tap headshot settings have evolved. Early on, these were considered bugs — now they’re essential skills.
With time, you learn:
- What settings improve your gameplay
- When to tweak and when to stick
- How to adapt your layout when new guns or mechanics are added
Instead of chasing “best settings,” I focus on my device + my comfort + regular practice. That’s what truly improves gameplay.
Final Advice for Beginners & Intermediates
- Customise slowly — don’t rush your layout.
- Test and practice your changes in real fights.
- Trust your experience more than YouTube tips.
- Keep a backup of your best settings in screenshots or notes.
With patience and consistency, you’ll develop settings for free fire that feel natural, boost your confidence, and help you win more fights. And as you grow, share your knowledge — helping others is also part of becoming a pro.
Source:
Free Fire Max: Free Fire Max
My UID of Free Fire: 1976851456
Free fire best sensitivity