

In Free Fire, having quick reflexes and perfect timing can make all the difference between winning and losing a fight. But even the best skills can be flopped if your on-screen buttons aren’t set up just right. That’s where the Free Fire Custom HUD Settings (Heads-Up Display) comes into play — it allows you to craft your control layout to fit your unique play style. Most new players start with the default 2-finger layout, but as you gain experience, switching to a 3-finger or 4-finger HUD can give you an advantage in battle.
Must Read: Top Free Fire HUD Code 2025: Only Headshot and Copy Paste
In this guide, we’ll dive into the best Free Fire Custom HUD Settings for various finger layouts, including the pros and cons of each, and even showcase a real-life example of a custom 3-finger HUD used by a pro player. Whether you want to improve your drag headshots, quick-switch weapons more quickly, or get moment speed, this guide will help you discover the ideal Free Fire Custom HUD Settings in 2025.
Table of Contents
What is a Custom HUD in Free Fire?
The Custom HUD in Free Fire enables players to rearrange the control buttons on their screen, including fire, jump, crouch, scope, reload, and more. Unlike the default layout that’s the same for everyone, a custom HUD in Free Fire lets you:
- Move buttons anywhere on the screen
- Resize them to fit your fingers
- Adjust transparency for better visibility
Using a Custom HUD in Free Fire gives you more comfort, better control, and faster reactions. It’s beneficial for players who want to shift from casual gameplay to competitive-level performance.
To access the Free Fire Custom HUD Settings:
- Go to Free Fire Settings → Controls
- Tap on Custom HUD
- Start adjusting button placements as per your playstyle
- Finish and save it.
Also Read: Save Free Fire Settings Permanently in 2025: Download within 1 Second
2-Finger vs 3-Finger vs 4-Finger HUD (Comparison Table)
| Finger Setup | Pros | Cons |
|---|---|---|
| 2-Finger | Easy to learn | Limited movement & aim combo |
| 3-Finger | Great for drag headshots, fast reflexes | Needs practice, small phones may feel cramped |
| 4-Finger | Pro-level movement + aiming + gun switch | Hard to learn, needs large screen or tablet |
If you want to up your game, consider switching to a 3-finger or 4-finger setup. This change can make a world of difference, allowing you to jump, fire, and aim all at once—something that’s pretty tricky with just two fingers.
Also Read: A to Z Settings For Free Fire: One Tap, Sensitivity, HUD, & More (2025)
Best 2-Finger HUD Layout
As Free Fire Custom HUD Settings are provided by default in Free Fire Max, you can also customise them. Several types of customization options are available.
- Adjusting button placement
- Adjusting the size of the buttons
- Adjusting the transparency of the buttons
- Removing unwanted buttons
This type of customisation can be done with two fingers, you can interchange buttons according to your preferences and comfort. 2-Finger HUD Layout allows you.
- Use Free Fire’s default HUD Layout
- Play in a basic setting
- Best for the Beginners
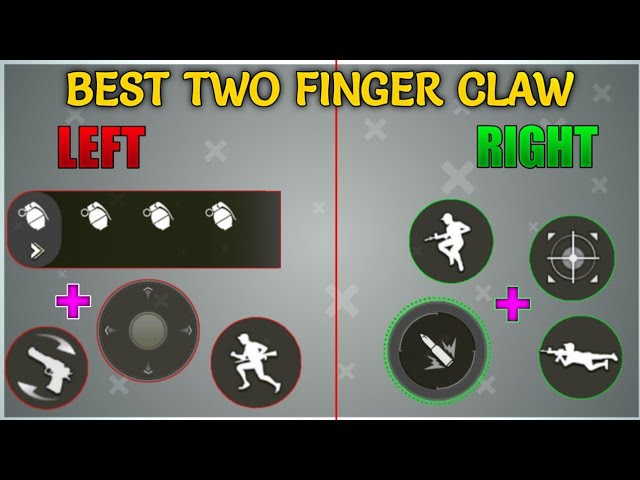
Best 3-Finger HUD Layout (Based on Real Player Setup)
As a 5-year Free Fire player using a Poco X6 Neo (6.67-inch display), here’s my actual 3-finger HUD setup:
- Right Thumb: Fire, Jump, Crouch, and Scope buttons
- Left Thumb: Joystick, Medipack, Bag, and Throwable Skills
- Top Right Finger: Gun Switch and Reload
- Top Left Finger: Map and Free Look
These Free Fire Custom HUD Settings allow me to:
- Perform jump + fire on the same side for perfect drag headshots
- Quickly switch guns without taking my thumb off the fire button
- Access the map and camera freely using the top-left finger
Pro Tip: Always place the Fire button on the right thumb for smooth drag movement. Avoid putting the Gloo Wall and Fire button on the same side to prevent panic misclicks during clutch moments.
Best 4-Finger Layout for Advanced Players
If you’re transitioning to a 4-finger Custom HUD in Free Fire, it can unlock even more fluidity. Here’s what a 4-finger layout looks like:
- Thumbs: Movement (left), Fire and Skill use (right)
- Index Fingers: Scope, Jump, Crouch, Reload, or Gun Switch
- You split control between the upper and lower screen areas
Advantages of 4-finger HUD:
- No delay in jumping + aiming + firing
- Easier to manage Gloo Walls during fights
- Best suited for large-screen mobile users with 6.5″+ screens or tablets
However, it will take time to train your fingers. If you’re coming from a 3-finger Custom HUD in Free Fire (like me), practice in Training Ground first before using it in Ranked matches.
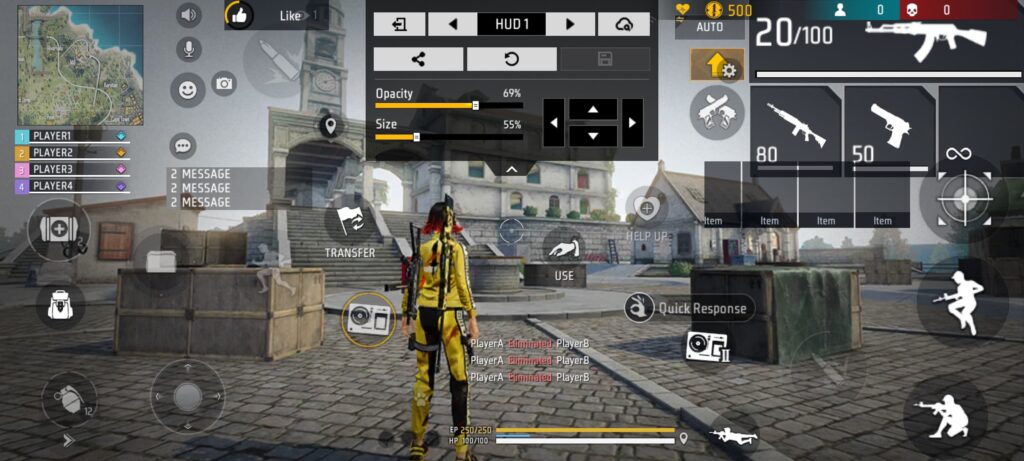
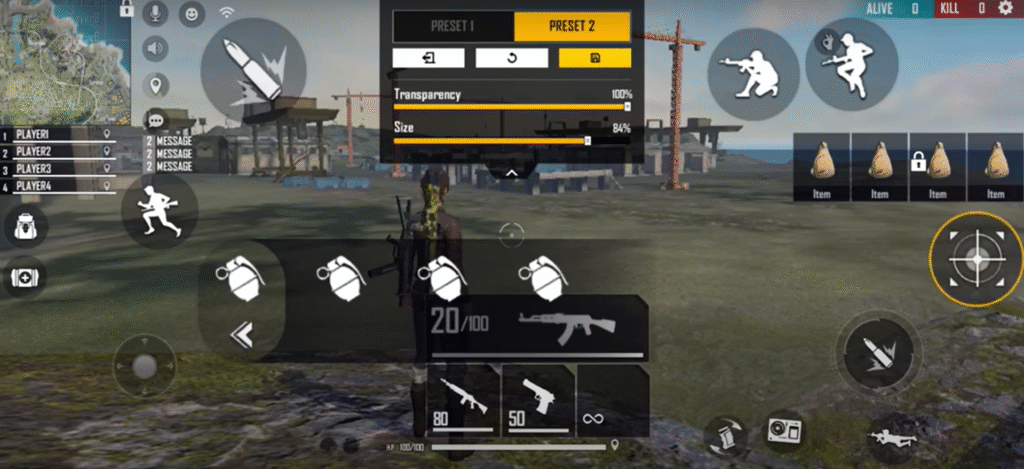
How to Create and Customize Your Personal HUD (Step-by-Step)
Creating a perfect HUD takes testing and patience. Here’s how to build one:
- Go to FF Settings > Controls > Custom HUD
- Drag and place buttons where your fingers naturally reach
- Resize important buttons like Fire, Jump, and Scope, etc…
- Keep the transparency of buttons around 50–60% for visibility
- Save multiple layouts and test them in training mode
Don’t copy pro-players Custom HUD in Free Fire blindly — what works for one person might not suit your device or fingers of others persons.
Tips to Master Custom HUD + Mistakes to Avoid during Setting
Here are some lessons from my own experience:
Tips:
- Use Training Ground to test new layouts and learn roughly.
- Keep button spacing/size natural to avoid stretching your fingers
- Gradually adjust sizes — a bigger fire button helps with drag headshots and quick touch.
Common Mistakes:
- Putting the Gloo Wall and Fire button on the same side (it will delay the deployment of the Gloo Wall)
- Make sure that you have no more than two important buttons on the same finger.
- Constantly changing the HUD without mastering one
Best HUD Layouts by Screen Size
| Screen Size | Suggested HUD |
|---|---|
| Small (<6.2″) | 2-Finger / Minimal 3-Finger |
| Medium (6.3–6.7″) | 3-Finger |
| Large (>6.8″) | 4-Finger |
If you’re using a device like Poco X6 Neo (6.67″), the 3-finger HUD layout is perfect. You’ll have enough space for gun switching and jump-drag combos without accidental clicks.
Conclusion
Your custom HUD is the backbone of your performance in Free Fire. Whether you’re landing drag headshots, switching weapons in the heat of battle, or dodging Gloo Walls, having the right layout gives you complete control.
If you’re a 3-finger player like I am, stick with a setup that feels comfortable on your device’s screen. Keep things tidy, maintain consistency, and don’t rush into changing layouts until you feel confident. And when you’re ready, gradually start practicing with 4-finger controls.
Also, be sure to check out my guides on Sensitivity Settings and Drag Headshots — they’re both closely linked to mastering your HUD.
What is the best HUD layout for headshots?
A 3-finger layout with fire and jump on the same side works great for drag headshots.
Should I copy a pro player’s HUD?
No, it’s better to use it for inspiration and then customize it to suit your hand and device.
Is a 4-finger HUD better than a 3-finger HUD?
Yes, for pro-level gameplay. But 3-finger is more beginner-friendly and easier to master.
Does Free Fire support gyroscope for HUD control?
No, the gyroscope only works in the home lobby, not during matches.
2 thoughts on “Best Free Fire Custom HUD Settings : 2, 3, 4 Finger Layout (2025)”